Wednesday, 10 October 2012

The 1200 is ALIVE!


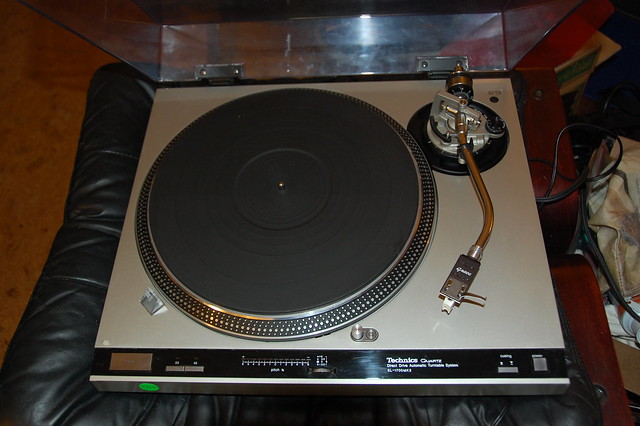
I got back into finishing the Technics 1200 in the last few days. I had been putting it off while waiting for parts, working on other projects or just procrastinating. However once I started again I finished in 2 evenings.

Heat shrink Technics tonearm

One of the problems with waiting as long as I did was the possibility of losing pieces and or just forgetting what went where. The good thing about this turntable is that there are so many pictures, forum threads, how-to's, documents and videos about it that as long as I had a computer near I could not get too lost.

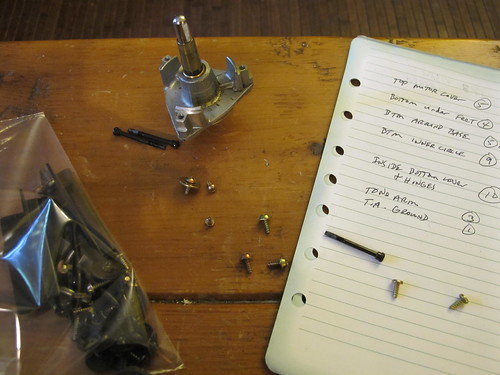
I still wish some of the parts came with some form of instructions though. KAB has some so-so pictures on his site but nothing at all comes with the actual parts, such as the hinges or turret board. Even suggested wire routing, or a parts list or sequence of assembly. I am very mechanically inclined but even so. I also think I might not have received some of the screws with the hinges. I could be wrong about that but anyway I managed to find some appropriate bolts in one of my bins.

Technics tonearm rewiring

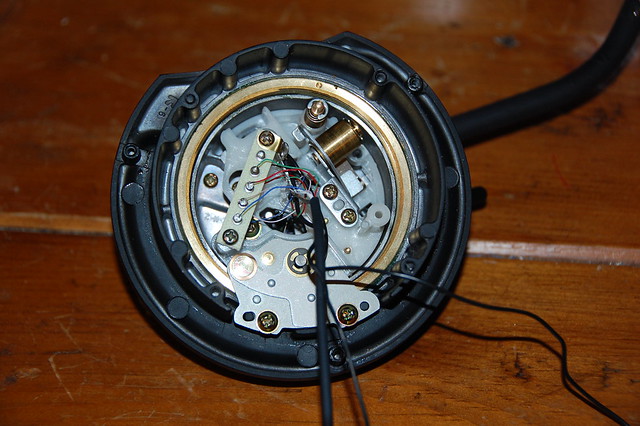
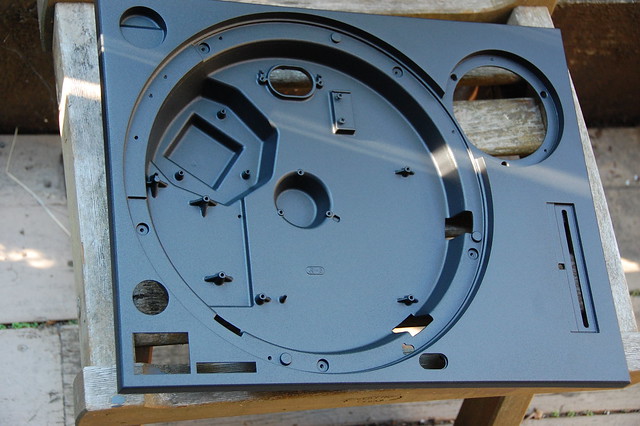
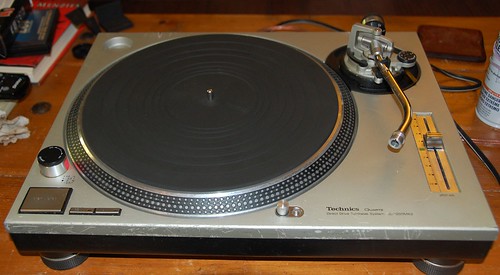
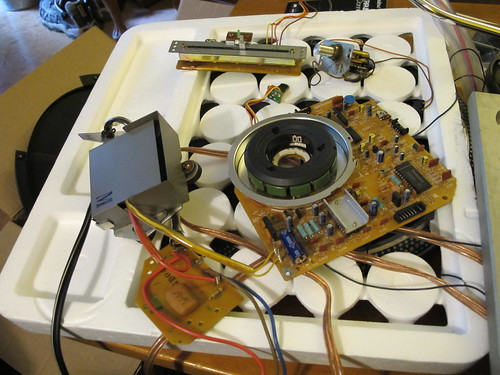
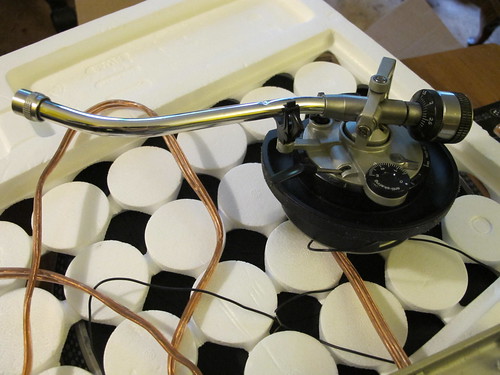
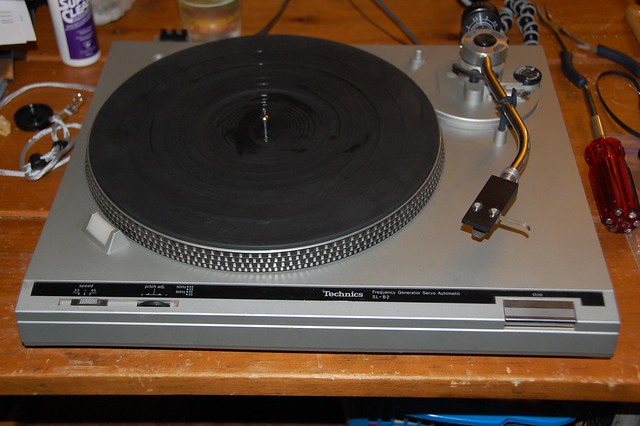
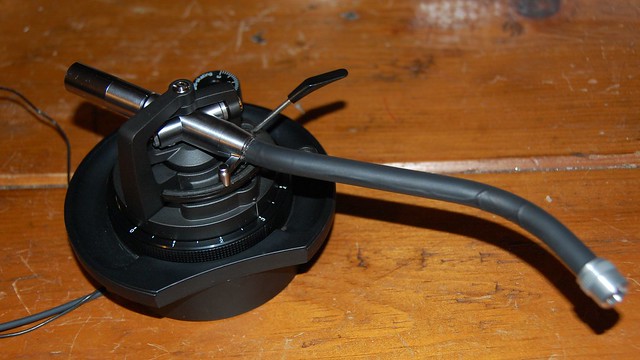
In the first pic above you can see the tonearm after internal wiring was updated with new Cardas 33g wire. I also added some cotton batting inside the arm as damping material to reduce resonance. The black stuff on the outside is heat shrink tubing to help play a similar role. However it looked ugly in that on the curves and ends it developed wrinkles. Pretty ugly and of probably very small sonic benefit, so I stripped it off.

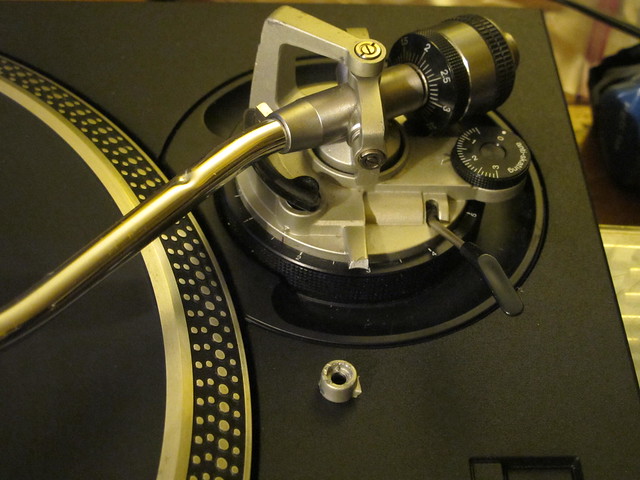
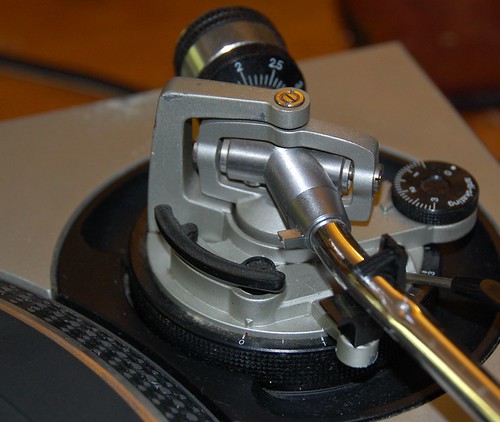
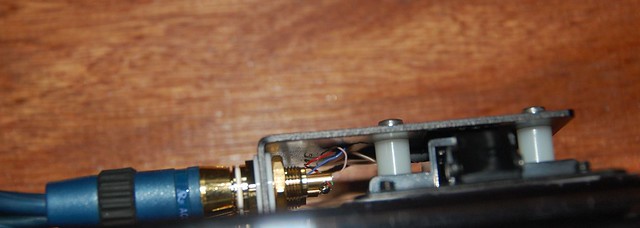
The second pic shows the underside of the arm with the new terminal board attached. The tonearm wire meets the external wiring at the 5 pin strip here. This replaces a small printed circuit board that Technics originally installed.

Some instructions online make things look dead easy. Easie-Peasie in fact if you can believe the English bloke on YouTube who has lots of videos on the 1200. He describes how to thread the 2 base parts together using the 0 marking on the height adjustment scale as a guide and he gets it right first try in a few seconds. The Technics Service Manual says use the 3 (scale is from 0 to 6 for millimetres of height adjustment) as your starting point. I tried at least 5 or 6 timed before I got it right, and using the Technics method, not his.

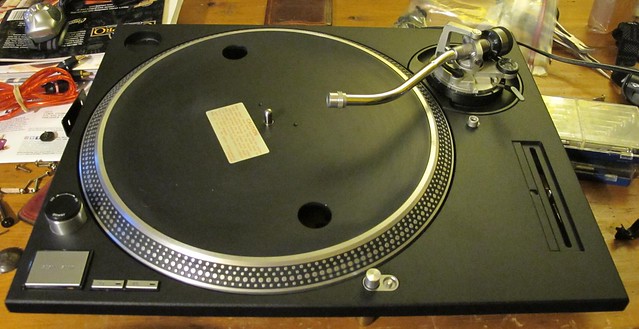
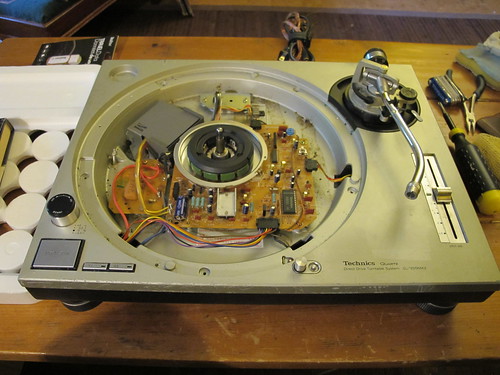
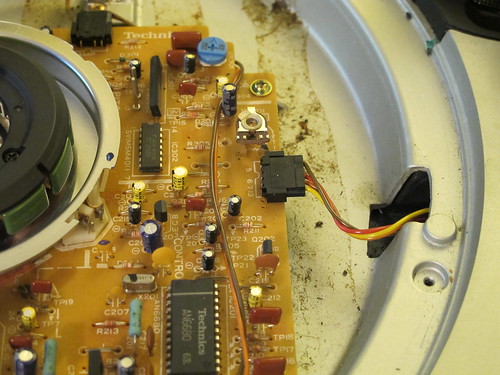
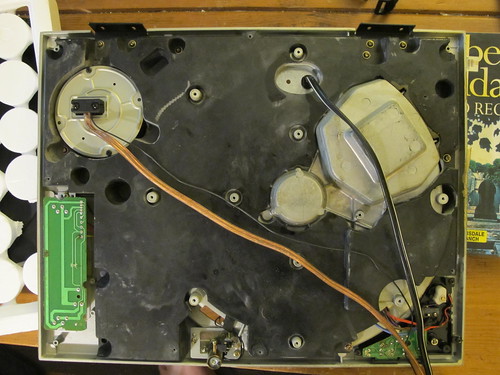
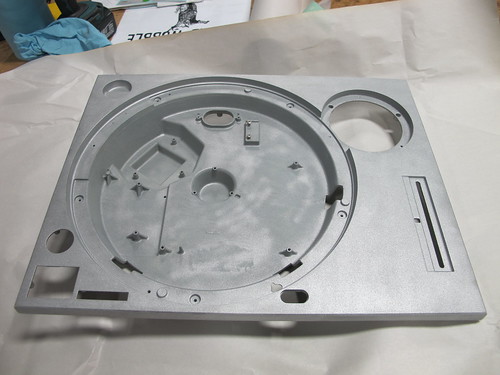
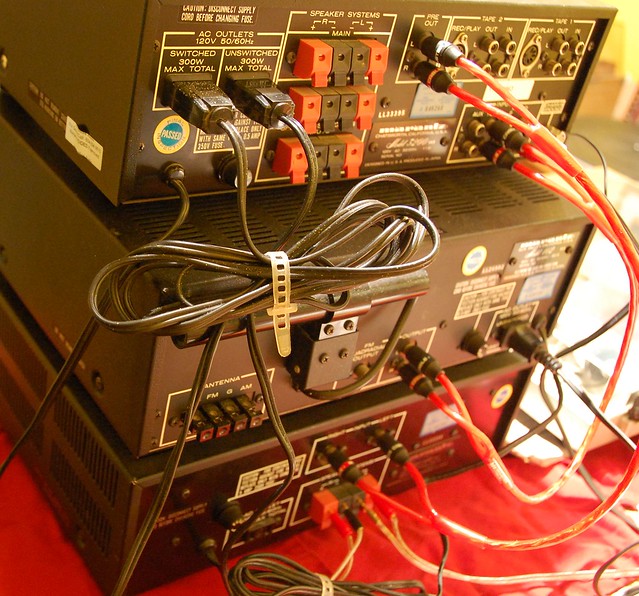
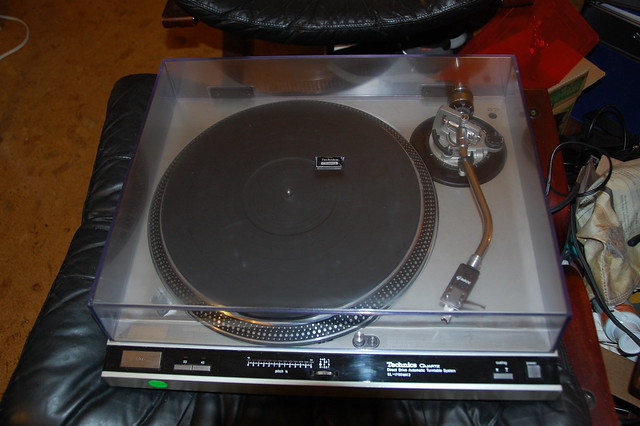
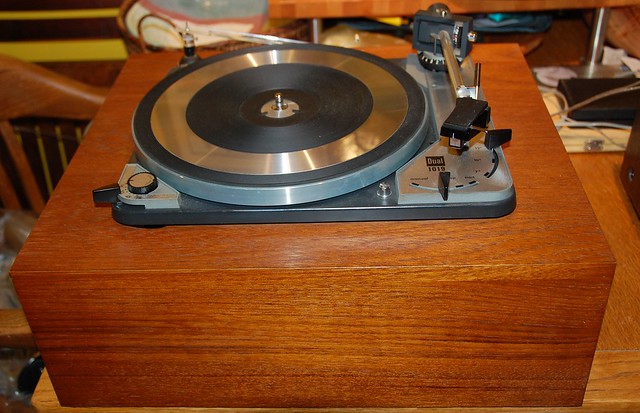
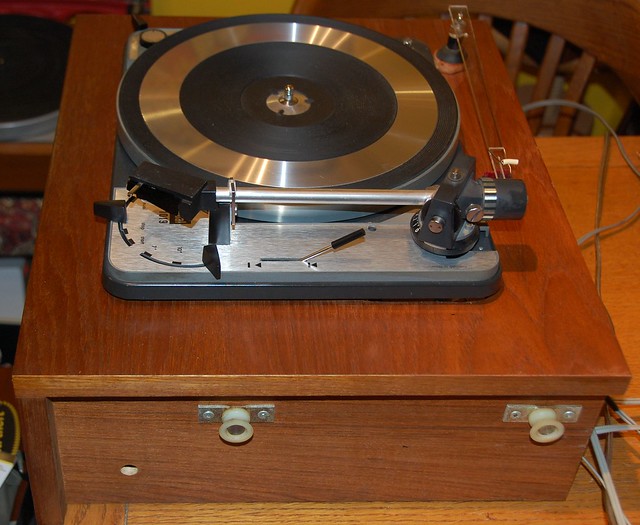
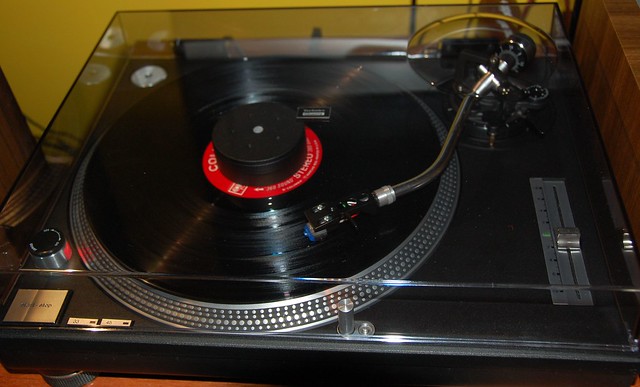
The next photo just shows an alternate view, plus the record weight I had powder-coated at the same time. Below that is a top view of the new KAB interconnect board. This attaches on the same bolts (longer ones than stock) as the right side hinge. This external connection enables you to use your choice of RCA cables. I don't particularly like the wires being as exposed as they are, but I used a bit of tape to anchor them somewhat, but I think I will also make a small clamp or sleeve to attach to the underside of the table to protect the wire.

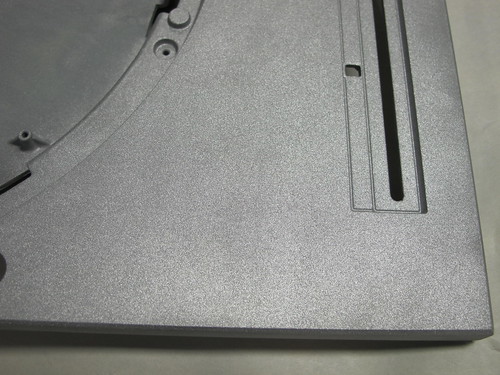
Another thing I supplied myself was some adhesive backed felt from a fabric store. This went under the pitch control slot and directly on top of the control itself and acts as a dust shield. Another piece goes on the underside of the knob itself.

Another Technics View

External RCA

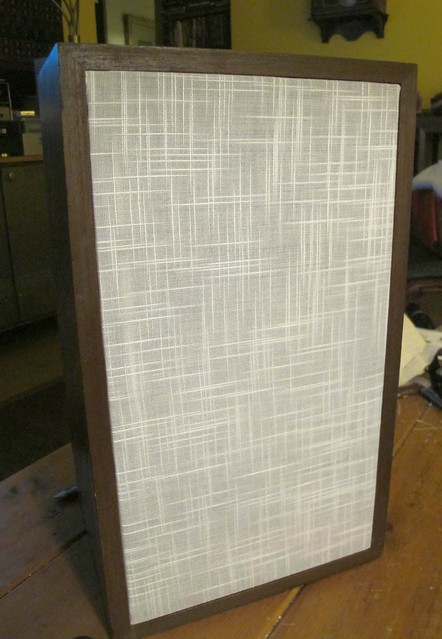
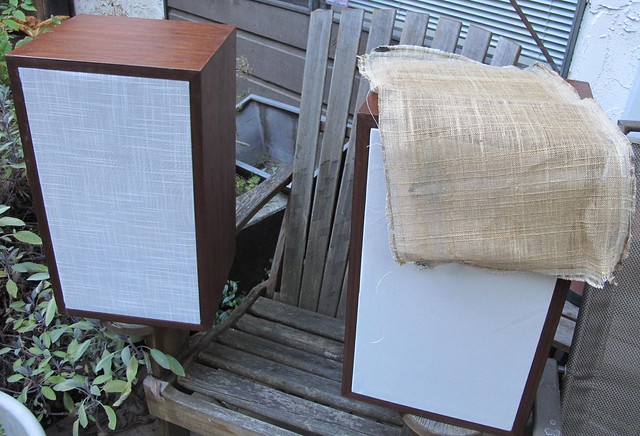
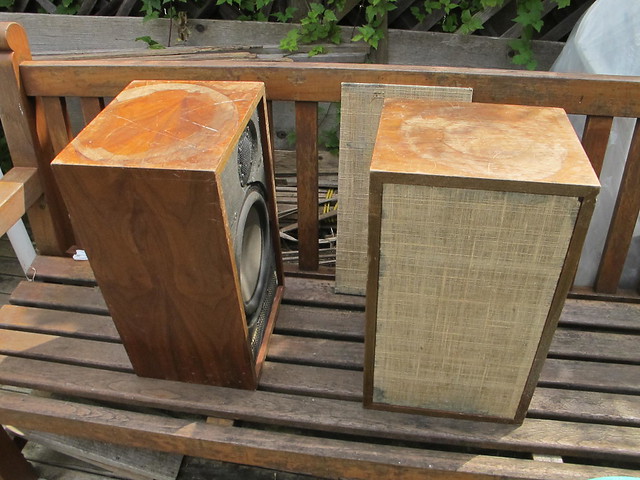
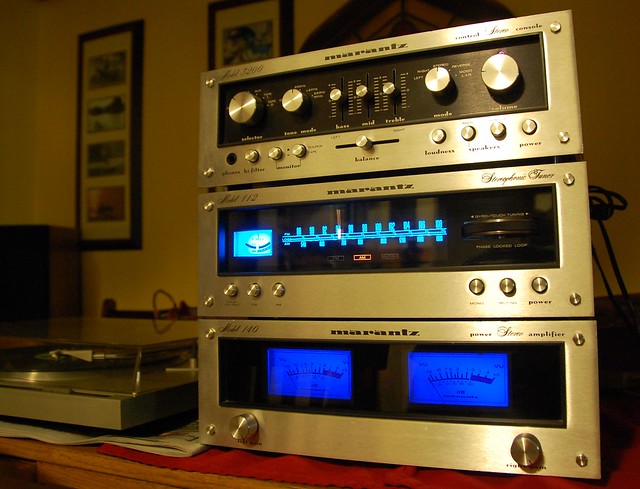
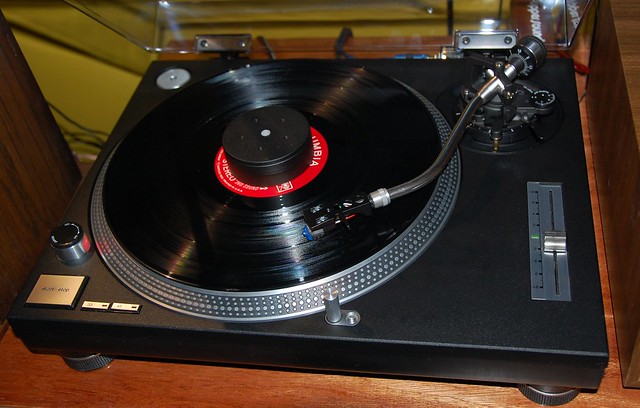
And finally the end result!

Technics 1200 MKII new lid

I am practically ecstatic with how good it looks. It also works great (but see below) and sounds terrific. I still have to fine tune a few things and there are still a couple of issues.

The cartridge position has to be checked, the VTA (tonearm height) and the anti-skate verified. One of the issues is that the tonearm rest does not fit this arm well. The mount for it on the old arm was just slightly different. I had to gently ream out a bit to make this fit, and I don't have the right nut or spacer for it. It also won't quite clamp the arm properly. I think that just maybe it was not from the same model of turntable. With the damage that was done to the old tonearm I would be surprised if this was also replaced at some point.

Technics MKII lid up


The bigger concern is a bit of speed instability. The pitch slider is supposed to completely lock the speed at the centre setting. It adjusts speed up or down by 8% over the range. When I first turn the table on it sometimes seems spot on, but other times runs very fast in the middle of the scale. It can be zeroed at a postition just off centre but that bugs me. When I have played a side or 2 it seems to stabilize and zero means zero. I have more testing to do, and some troubleshooting.

A lot of my stuff has been coming courtesy of KABUSA, just so you know.


Saturday, 15 September 2012

Technics 1200 and Dynaco A25 updates

Some updates on previous projects:

The Technics 1200 came back from being powder-coated a couple of weeks ago and has been partially assembled. It looks really good in black and the Sandtex texture works great.  


DSC_0006

I had ordered some parts for it, in the form of a new pitch control bezel and some Cardas wire for the tonearm. The pitch thing is adhesive backed and removing the old one ruined it. As for the wire, I figure that if I am going to replace the arm anyway I might as well upgrade it.

However the tonearm work is on hold pending the arrival of more parts. I was investigating the tonearm rest clamp and wondering why the clamp would not snap around the arm tube. The tonearm is bent on this table and is being replaced anyway, but it appears that whatever caused the dent  in the tonearm had some collateral along with it.


IMG_0001

That little piece you see above is not supposed to sit there. It's supposed the be an integral part of the tonearm base just above it. I determined that the extension the arm rest attaches to was bent. So I tried to straighten it. Wrong! SNAP!

Oh well, it was bent anyway and I should have known that would happen with cast aluminum. In any case it meant another $60 expenditure to get a tonearm base on ebay. It's coming from Asia so could take a while. But it will be black so will probably look better too. It also won't have the marks on it that this used one had. I'm getting closer to a "new" turntable all along.

Below you can see how it is coming along, though some of these parts are going to come off again before the final assembly.

IMG_0004


As for the Dynaco A25 refinishing project, that took a turn for the better last week. 

I found a better grill cloth in the form of some polyester drapery fabric in a linen like texture. It's not just like the original but at least reminiscent of it. The colour is lighter and almost white which is fine as I like the contrast with the fairly dark wood stain.


Speaker cloth

The weave is tighter but not so much I think it would have an effect on the sound. It is much easier to work with than the other stuff I tried as it is not stretchy. In the next picture you can see the original linen (probably darkened with age and certainly with dirt), and the stretchy stuff the fabric store employee sold Linda when she asked for "speaker cloth" (on the right) and the stuff I close on the left. The best thing is that it was only $4 per metre.


Dynaco cloth

Friday, 24 August 2012

Technics 1200 Gets A Makeover, Part 1.

I picked up this Technics 1200 MKII a couple of months ago from a guy I know at a local flea market. I did not pay a lot as these tables go, but it needed a lot of work to get to a point that I would be comfortable either keeping it or selling it.

Technics 1200

It was quite scratched up especially around the front edges, the platter has corrosion most noticeably the strobe dots. The tonearm has a dent just ahead of the cueing lifter and the cueing "foot" on the side of the arm is broken off. Other incidental marks, no lid or hinges. It came with a generic headshell and a Shure cartridge, though the model escapes me right now. Maybe an M95?

Functionally it was pretty good. Bearings and pivots seem ok, speed a bit off but not much. It will not switch back to 33 rpm from 45 except when you turn it off, but that might just take cleaning.

Technics arm

I had no intention of doing a half-assed job of this. I might not be going full audiophile on it with tonearm rewiring and other tweaks, and I am definitely not pimping it with extra LEDs, smoke and mirrors. I want it to work as well as originally intended and to look as good as new or better. Not too much to ask, right?

I ordered from ebay a tonearm, a lid and hinges. They were all new and unused from a vendor with lots of similar items. Having them shipped to my USA depot meant free shipping so the total was about $100. I've had them waiting for a month or so now.

Technics 1200 1

The great thing about the 1200 series of turntables is that it was simply the most popular turntable ever made (I read that somewhere) and there are vast amounts of parts available. There are also many resources around on tricks, modifications and how-to articles. No new ground here, but I have taken lots of pictures to document the disassembly and other steps.

Technics 1200 2

This darn thing has lots of pieces. And this particular table was also a mess inside. Looks like spillage and maybe a mouse nest!

Technics 1200 4

Technics 1200 5

Technics 1200 6


I eventually got it completely stripped down to the point that the top of the plinth was ready for the next steps, cleaning and sanding. The box of parts and tonearm were set aside for now, but will get some work while I wait for the plinth to come back from paint, or rather powder coat.

Technics 1200 10


Technics 1200 11

I am lucky in that I know someone with a machine shop and sand blaster, using walnut shells specifically. He also lets me use some of the equipment sometimes. I did some sanding to get the worst of the scratches reduced with a medium grit sanding sponge. Then it was off to Toby's today where it took me an hour or so to get everything off the top. I also took most of the finish off the non exposed surfaces but was less fastidious about it.

Technics 1200 8

Technics 1200 9

Technics 1200 7

It looks pretty good at this point. Toby, Robert and I talked about the best way to finish it. There are spray paint options plus powder coat, and one I had not thought about until today and that was anodizing. I thought that would look great but one issue with that is the fact that it hides nothing. Any imperfections would be glaringly obvious and touch-up impossible. It also turns out to be quite tricky if the alloy is not exactly right to take it. That last fact I found out when I took it to the anodizers. However my second choice of powder coat was also something they offer so I took it to their other shop down the road.

There it will stay until at least next week, and will come back to me with a finish type called SandTex black. This should not only be somewhat unique, but a good finish that won't show finger prints.


Monday, 6 August 2012

2 Hour Dynaco Speaker Refinishing

I picked up a pair of Dynaco A25 speakers in a yard sale a couple of months ago. They were quite beat up but are a quite desirable and still highly regarded model from 1969. Even though they were made in quite high numbers and sold for just $79.95 each back then, they hold pretty good value but they don't seem to pop up very often around here. Even so, when I saw them I instantly thought I knew what they were and I was right.

Dynaco A25 1

Chipped veneer, serious water stains from plants, scratches, stained and torn grill covers. At least the drivers looked fine and "they work" claimed the seller. The drivers were also dirty but thanks to rubber, not foam, for the surrounds they looked intact.

I am no expert at refinishing and I did not think that without a real effort and possible re-veneering that these would look show-room quality again, so I did a quick power-tool enhanced job on them today. I just wanted to make them good enough for me.

Dynaco A25 2

With my sanders, both belt and orbital, I soon had the finish completely removed from one. On the other one the water damage went quite deep and I ended up going beneath the veneer or into a flaw in it at least. Too bad about that but I can use some filler and colour matching to hide it.

I did what would also probably be considered really bad form by not even removing the tweeters and woofers. Since they were dirty anyway I was not too concerned, but had to be careful. I found the terminals were soldered anyway and did not have my soldering gun nearby.

Dynaco A25 3

I went over all the veneered surfaces with walnut stain that was already nearby but had to run out to the Despot and get some MinWax oil finish even though I was sure I had some around. So the 2 hours actually became more like 3.

Dynaco A25 5

After cleaning the drivers and faces with damp cloths, and a bit of buffing and wiping down the results are very good. I will still do a bit more work partly because it started to rain a bit and before I noticed I got more water marks! The few tiny spots will come out easily though with a bit of gentle sanding and more stain and/or oil.

The grill faces will get re-covered soon. Linda looked at the fabric and said "transparent linen, they should have some at the fabric store". It was too hot and being a holiday we do not want to risk driving to the nearest big one to check, but she will tomorrow. If they don't have it I can check out the local electronics store.

Dynaco A25 6

So I think they look pretty darn good so far! Too bad I sanded too deep on the one side. Be careful with that belt sander, Eugene.

With the combo of the dark stain and the oil finish I probably did not have to take out the entire water stain and it would have been masked. So it goes.

I'll bring them inside soon and check out how they sound. Eventually I will get around to replacing the crossover capacitors and maybe the binding posts. That will be another day and post.

Edit: A day later...

Linda stopped at a fabric store today to get some grill cloth. I was hoping for something more like the original linen, somewhat coarse and a bit like cheesecloth but that is not what she brought home. It's a bit stretchy and synthetic and much whiter. However I think it will turn out fine after all and might just grow on me. Only done one so far though.

Before grill cloth but sounding good:

Dynaco A25 7

After cloth, I think the contrast is good:

Dynaco A25 8


Saturday, 4 August 2012

Marantz System is up for sale! $650...I mean is SOLD!!!

I decided to sell my Marantz 140 power amplifier along with the 3200 pre-amp and the 112 tuner. The trouble is, when I hook up something to make sure it is all working fine and so that I can demo it to prospective buyers, I end up with cold feet!


If you would like to buy this system, you can use the PayPal button below but I would rather do this locally and in person. Please note that I will ship, but it WILL NOT BE CHEAP and will be calculated later. Shipping weight will be close to 40 kilos and ideally in 3 boxes.

I don't need it for sure as I have several other more-than-capable receivers including another Marantz. It  is the only system of separates though and it does sound pretty darn good The looks are not bad either.

I want $650 for the system as you see it. If you don't want the LED bulbs, I will change it back to incandescent fuse lamps and knock $50 off the price. The displays will probably look cyan green if I do that.

edit: SOLD!! In one day!

Maybe I should have asked for more money??

Marantz 4

The amp puts out a conservative 75 watts per side and in my space the needles barely flicker. The 3200 preamplifier is the period and model specific mate as is the tuner, model 112.

All the pieces are clean inside and out and the meter fuse lamps have been changed to LEDs, as have the tuner back light bulbs. The LEDs restore the Marantz blue that typically turns to green as the vellum paper ages and yellows with the conventional bulbs. That is if the bulbs still work as they burn out eventually anyway. The meters came out a different sort of blue, maybe partially because of the LEDs being done at a different time were from a different source. Or possibly it is because they deflect into the meters, rather than directly back light the face plate in the tuner.


Marantz 2

Marantz 6

Some people are purists about the old gear though, so LEDs are verboten. Incandescent only, even though it generates lots of extra heat that deforms and yellows the plastic surround the bulbs, and burns out readily. LEDs are much cooler running and will last practically forever but may not have that "original" look. Whatever...the LEDs look good and work well.

Marantz 5


Wednesday, 25 July 2012

Sometimes I could slap my friends


No, I don't mean slap that way...I mean slap them for things they should be better at maintaining.

I am referring to my friend Jeff who used to be a bike mechanic, and now works for a coffee roaster. I went there today to buy some of my favourite beans and, though he wasn't there, I ended up coming home with his turntable. His co-workers, also old friends, know I like to work on vintage gear and especially turntables gave me Jeff's Technics SL-B2 to take home and repair if I could.

Admittedly this table has spend much of it's life in this warehouse-like space, but "come on Jeff! It's filthy!" At least I would have said that if he was there. Jeff does not even know I have the table.


Technics SL-B2

They did not give it to me to dust it off. It had other issues, and what they reported was it would not shut off. Before I began to work on it I had to clean it.

Technics SL-B2 2

The good thing is that nothing was broken or cracked that I could see. Mostly dirt and perhaps a burnt or melted spot on the lid. The base for the carbon fibre brush was held on to the plinth with masking tape.

I opened it up and examined the return mechanism, expecting something had popped out of somewhere. It took maybe 5 or 10 minutes inside to trace down the problem.

The Auto-return mechanism is run by a cog on the bottom of the spindle which is turned by the belt of course. This engages with a larger toothed cam at certain positions of the tonearm or when "asked to" by pressing the Start/Stop switch on the deck. The cog on the spindle had sort of fallen off the bottom of the spindle.

Technics SL-B2 4

I except it might have happened from being knocked around or something being dropped on the top of the spindle. The cog fits on some knurling on the shaft and had dropped off the bottom. With some long needle nose pliers I was able to snap it back on. Cycling through the actions of tonearm and switch confirmed I had fixed it.


I will still be doing more cleaning and lid polishing and will make sure the cartridge is aligned correctly before I give it back. However after less than an hour on it I would say it looks (and works) a heck of a lot better. I'll take a couple of pounds of coffee as payment...and give Jeff a good slap!

Technics SL-B2 3

Saturday, 26 May 2012

Technics Rubber and Dual in a Drawer

I had a Technics SL-1700 MKII turntable in the house for less than a day. It's a very nice table, and one I could easily live with, but I barely even got to sleep with this one. And even less so the Pioneers Pl-518 that was here for only about an hour.

DSC_0079

The Technics and Pioneer both belong to Clint at Space Lab and I was just tuning them up. The Pioneer really just got a cartridge and tonearm alignment as it seemed to have no issues.

The 1700 had what is a common failure on this model. This model is essentially an SL-1200 but with auto shut-off. The cueing and tonearm return is done by a small motor mounted horizontally under the right side of the platter. This motor uses a belt to drive a pulley running the mechanism, and the belt crumbles after 20 years or so. That's exactly what I found in this one...plus numerous cockroach carcasses. Yuk!

Anyway the shop vac took care of the roaches and a produce elastic took care of the shut-off, at least temporarily. It worked great but today I picked up a O ring to replace the elastic. I was not sure the size I bought would work as the rubber was a bit thicker than the original (and definitely than the elastic band), but the diameter of about 1.25" and 1/8" thick worked fine.

I meant to take a picture of the inside area with the elastic band but forgot while I was working on it. I spent a good amount of time wet sanding and polishing the lid too. It works great and looks pretty nice now though.

DSC_0078

As part payment (or something) for the jobs I am doing for Space Lab, or maybe just because he just likes me, Clint gave me a Dual 1019 turntable the other day as well.

The 1019 is one of the most highly regarded of their turntables. Well built and reliable, or as much as a 40 year complicated piece of machinery can be at least. This one has definitely put the nail in the coffin for the 1219 I have already.

Dual 1019

http://www.vinylengine.com/library/dual/1019.shtml

They all have their fatal flaws though and probably the worst of this table is the cartridge mount, sometimes known as the "sled", the TK-11 or TK-12. They can be prone to failure from stress and corrosion and tend to command high prices when you can get them. I bought a knock-off on ebay yesterday that might be better than the original with luck, as I plan to give the sled with this one back to Clint.

I call this the Dual in a Drawer as that is what it was until recently. It came out of a custom made cabinet for a Harman Kardon Citation and Thorens system. It has rollers on the sides for drawer glides as this was the secondary turntable in the cabinet. The Thorens was accessed through the top.

Dual 1019 side

I will remove the rollers eventually and do something around the sides, but the wood is so nice that I think I will try to do very little to modify the base.

I will have to get underneath to clean and lube, and perhaps adjust the idler and a few other things. I think I have a bit of wiring to work on too, but cosmetically it is very nice.