Tuesday, 25 June 2013

Holy Steuerpimpel!

It seems to be raining turntables around the home front, especially Dual turntables. Actually it has rained Kenwoods and Technics as well but that's for later.

Dual 1242

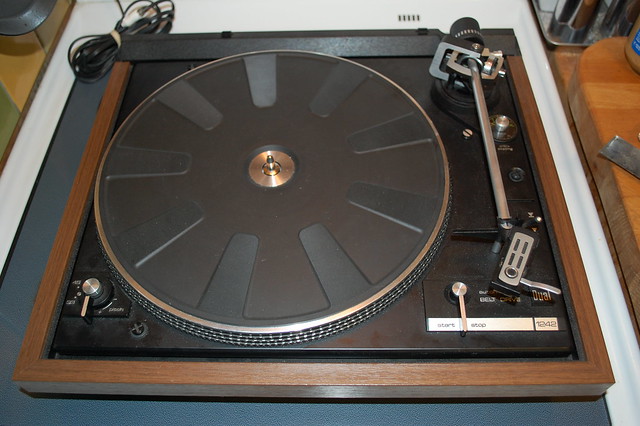
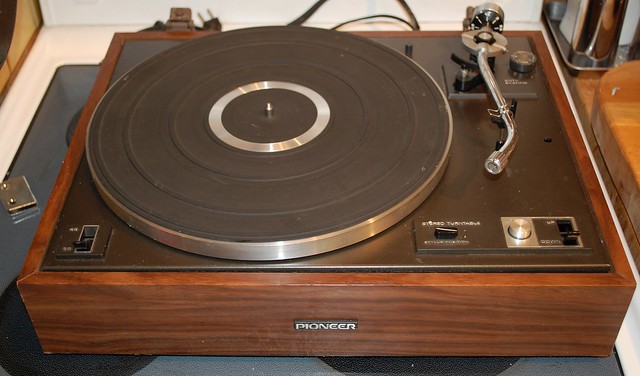
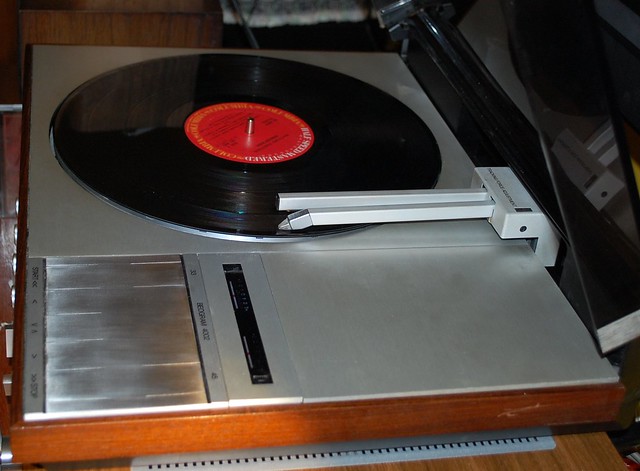
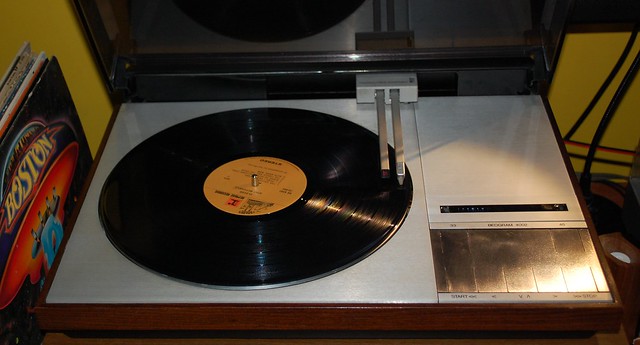
I brought home for repair 3 different Dual 12XX series tables lately and in the last 2 days have worked on all of them. The 1225 has already gone back to the owner but I still have the 1228 I brought home yesterday and the 1242 from today. Even the ones that I still have I made progress on though and they should be working well soon.

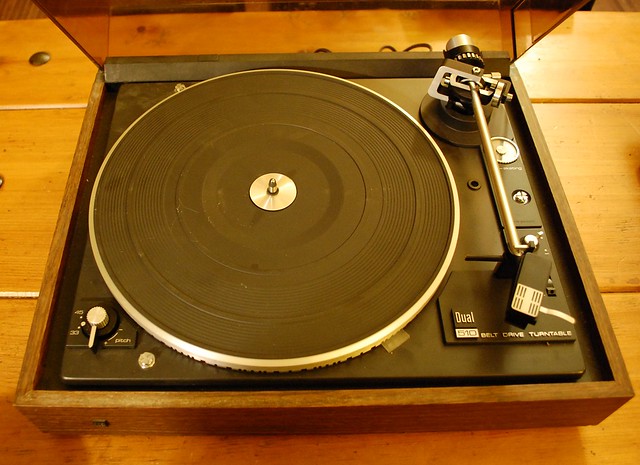
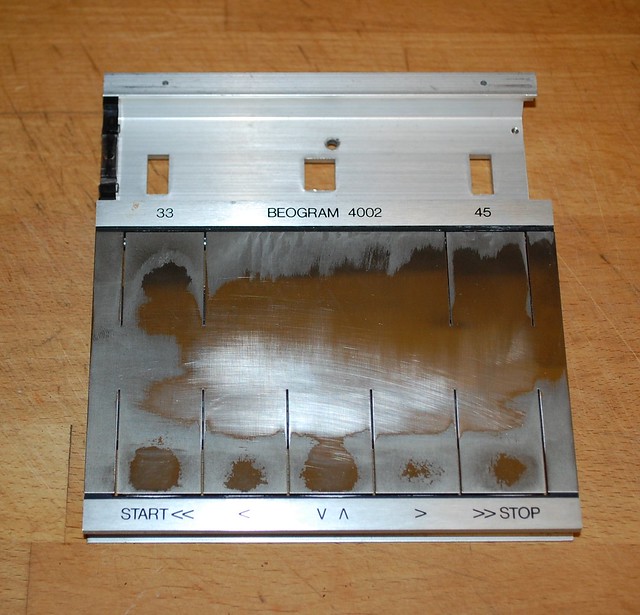
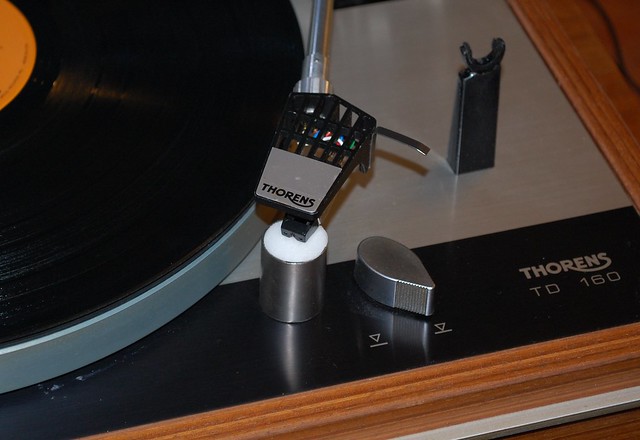
Among other issues the 1242 above had a stylus that was nearly gone and the 1228 below had no stylus whatsoever. Both of them and the 1225 all had the most common Dual problems.

The mechanism of the Dual changers has a lot of moving, pivoting, sliding, rotating parts. All of those have some need for lubrication either by oil or grease. That lubrication gets dried and caked and stops doing the job very well. Another area needs little to no lubrication and in fact relies on just a bit of friction to operate.

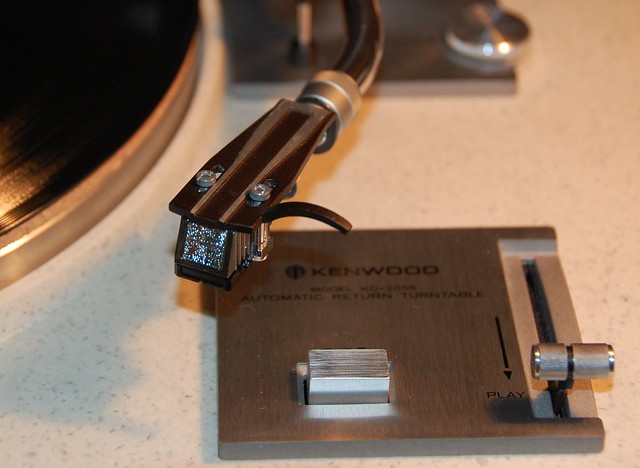
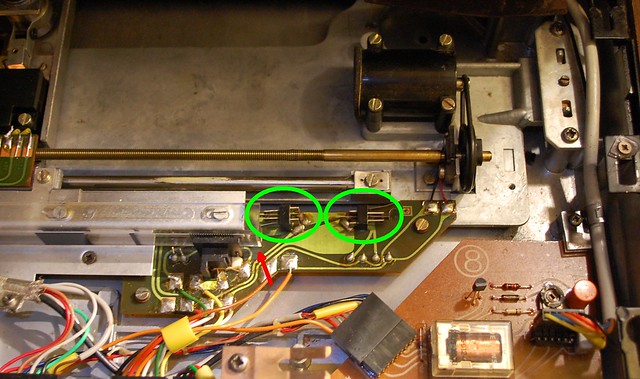
That area controls the movement of the tonearm during the Start phase in automatic mode and the Return of the tonearm at the end of the record side. It relies on a steuerpimpel to do the job. A what? A steuerpimpel. It's a little plasticy bumper that sits on the clutch pin and slides against a platform taking the tonearm with it during the arm start and return action. When the needle is on the record it sits a bit away from the arm and the arms nearly friction free.

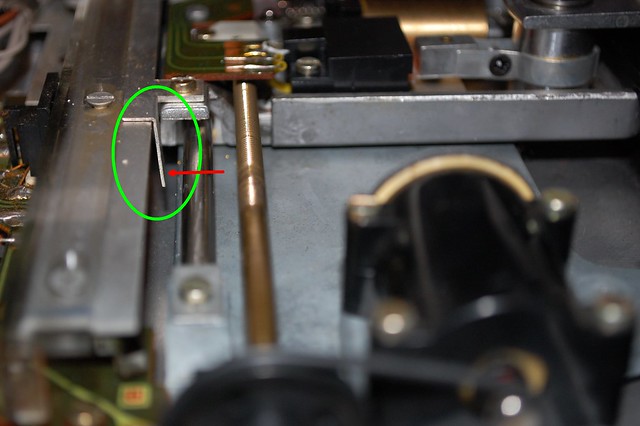
This pin is where the steuerpimpel goes. (Seinfeld to Costanza: "You just like saying that don't you?")

Dual clutch pin

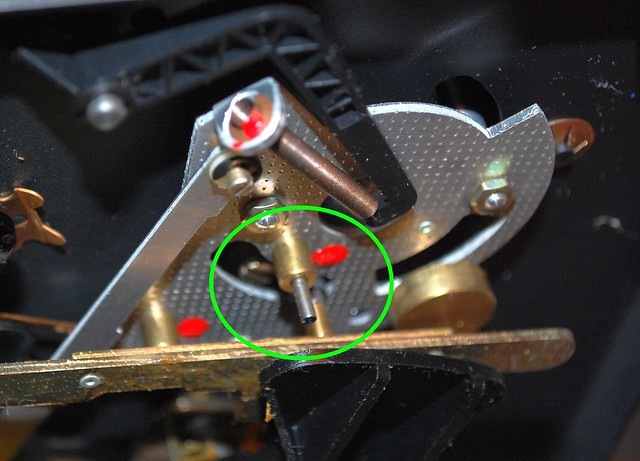
The steuerpimpel almost always fails after 30 years or so. The piece just disintegrates and breaks apart. When it does the arm won't move properly if at all. The part is also not that easy to find but also is easy to fabricate once you figure out what to use. I tried heatshrink tubing, small sections of the end of pen refills and other sizes of wire insulation but settled on 14 gauge insulation as it seem to provide good performance and fit.

Steuerpimpel in progress


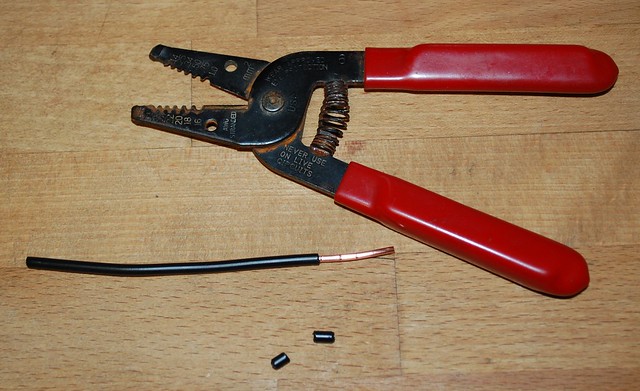
16 gauge might work but 14 goes on easily and when cut nicely to the right length seems to work well. The 1242 has a longer pin and seems to prefer about 6mm long but the other 2 are best with 4mm. The key is that it should be just a bit longer than the pin itself so that the metal does not stick out. The smaller piece shown is about 4mm and the longer is around 6mm. Below is the longer one once installed.

Dual clutch pin 2          

I love simple fixes. That's not to say that every Dual turntable problem has a simple fix, but this one is not bad once you work out a few details.

Aside from that these turntables work amazing well after so long that I am starting to enjoy working them. I still have some other details to address on both the Duals sitting here but once again, another day...


Who needs Linear when you have Zero 100?

My latest favouritest turntable is this Garrard Zero 100. It is not quite my latest, and perhaps not my favourite but it's very close on both counts.

Garrard Zero 100 5

This was manufactured in the early 1970's. It addressed effectively the error that linear tracking tonearms also worked to resolve and that is that cartridges with elliptical styli (or any shape other than conical) would not always be at an ideal angle to the record groove.

Records are cut or mastered by arms that move at a tangent to the groove. Most tonearms move through an arc and present a different surface to the groove that can cause a different "interpretation" of the music trapped in the vinyl. Through careful alignment one can minimize this variance but it can't completely be eliminated with the conventional tonearm.

Garrard Zero 100 ad

Above is an ad from an audio magazine dated August 1973 that describes how the Garrard Zero 100 addresses the problem. It does it very well and with a great deal of style.

Garrard Zero 100 6


Garrard Zero 100

The Zero 100 is another idler drive, much like many Dual turntables. It's also automatic and comes with a single play spindle and a changer spindle. The extra spindle and 45 adapter are stored in a little box under a wooden cover, reminding me of a cigar humidor.

The performance is great, though I have some small issues to work out. The manual switch does not always want to stay engaged for example. Also the lid is a bit funky and someone tried an even funkier repair on it. The lid is in 2 parts and the tabs that hold the smaller piece to the base had broken off and whomever had drilled through it in the wood base. I've got a plan to fix that but more on it later.

For the time being I really enjoy the look and it does not sound half bad either!

Saturday, 18 May 2013

My First Record Meet and Her First Record!


First Record

Today I had a table at the Main Street Vinyl Record Fair here in Vancouver. This is the first time I have attended a record swap meet as a vendor though I have been to a bunch as a buyer. This event is a 2 day one this year and continues on Sunday. I won't be there tomorrow...unless I go back to shop!

I had fun and made a bit of money. However I wasn't there as much to sell records as most people. As I said in my last post, I was also selling turntables. I also advertised my services in repairing and providing advice on stereo systems. I gave out a lot of cards for AFishNeedsAStereo. :)

I did have a few boxes of records though and managed to whittle that down by about half. Someone I know thought they were doing me a favour the other day by giving me a box of records to take along. Being mostly kids music, James Last, Hooked On Classics and so on, that actually became a "FREE!" box. Thankfully almost all of that disappeared so I don't have many to drop off at the thrift store. I did hold onto a couple of Bill Cosby records from it though. Oh yeah, I also kept a Breakdance instruction record. I can't wait to start headspinning.


I had some good conversations with people, met some old friends, met some new ones and made some money. Giving away records was fun too. One old gent with a cane was chatting with me for a while though I could barely make out what he was saying as he had a soft voice and the speakers were too close. However the 86 year old did say he like spoken word records, so I dug out a Dylan Thomas album that I had priced at $2 or $3 and just gave it to him. It was probably the only record he acquired that day, even though he must have paid the $2 entry fee. 

And the little darling at the top also received a free record (from the free box). I am sure it is her first and though she had no idea what it was, she had a good grip on it and was hopefully going to hear it when mommy took her home. 

Tuesday, 16 April 2013

Vinyl Swap Meet Coming Up!

I am really going to join the ranks of the record geeks now that I have booked myself into a vinyl sale for next month. I am not sure how many records I personally will have for sale, but do expect to have a few boxes put aside by then and should have enough to fill at least half my table.

The other half will have a small stack of turntables. According to the organizer I will be the only one who plans to have any hardware for sale. I will be there on Saturday May 18th, but the show continues on Sunday the 19th.

I will post a few tidbits of what I will have to offer on the vinyl side later, but here is a sample or teaser of what might come up turntable-wise, tuned up and ready to plug'n'play:

Nice Pioneer

Harman Kardon ST-7

Audio Reflex MR-114 3

Kenwood KD-2055 Headshell

Dual 510

Here's the blurb from the Main Street Vinyl Fair website:


Next Vinyl Record Fair...

Dates : 
Saturday, May 18th & Sunday, May 19th
MAY LONG WEEKEND 2013
Time : 11 am – 4 pm
Place : The Cambrian Hall
215 East 17th Ave, Vancouver, BC
Entry : $2 at the door
All Ages
Featuring great music by the Knights of the Turntable!
Over 40 Vendors Over Two Days!
Only one table per vendor means only the best stuff at the best prices.


http://www.vinylrecordfair.com/

Thursday, 28 March 2013

Whacking Danish Moles


B&O beauty

Bang & Olufsen. One of those companies you have to love and hate.

They make beautiful audio equipment that is as much about lifestyle as it is about quality sound. The quality of construction is impeccable and the design aesthetic is outstanding. It might not be everyone's cup of tea but it does impress MOMA enough that they have 12 pieces in their collection designed by Jakob Jensen. I have owned one of them (the Beomaster 3000), and have recently been working on and listening to another, the Beogram 4002 turntable.


However as great as it is, the stuff does have complications that go along with it. The engineering and design is very much proprietary. Many parts are not shared with other companies or even other B&O models and are not available any more without wide and long searches through ebay and the audio geek forums. For example turntables use cartridges that can't be sourced and must be re-tipped at great expense, or you take a chance at ebay.

The good thing is that the Beogram 4002 I am listening to Santana on right now did come to me me with not one but 2 good original cartridges. In other areas it was not so great.

B&O 4002 1

Cosmetically the biggest problem was the paint wear on the switch plate. The different sections depress switches for start, stop, left, right, cueing and speed. They obviously don't have good paint in Denmark as they were very worn looking. Or the original owner had very acidic skin oils...
Actually it seems to be a common problem with these. I did not want to spend time on issues like that however until I made sure it worked well.

The table came to me with reports of the tonearm not dropping to the record when it was supposed to, or at best only doing it sporadically. A little internal investigation and web searching lead me to the relay and solenoid that operates the linkages which lower the arm. The solenoid and other moving parts have old lubricants on them that can get hardened or gummy over the years. After cleaning & oiling these, though not fully disassembling, I was able to get much more consistent tonearm dropping. I went down a few of the wrong paths first but once it did seem to be going in the right direction I went for the cosmetic treatment.

B&O 4002 switch plate

It is a bit of a jigsaw puzzle, figuring out how to take this table apart but I worked it out. The switchplate is actually stainless steel glued on to machined aluminum parts. It did not take long to sand it down with fine wet sanding paper and a final pass with a 4000 grit pad. I clear coated it with 3 coat of satin Tremclad.

B&O switch plate painted 2

It looked great so I put everything back together after doing some other internal cleaning such as switch contact points. Oh yeah I also polished the lid with wet sanding and Novus polish.

There are numerous little dovetail and notchy kind of fittings that I had to reshape a bit or add some washers to in other places as some small plastic pieces had broken or gone missing. Once back together, it worked. Sort of...until up popped another mole to whack.

The motors now refused to shut off once the arm returned to it's standby position at the far right. the platter would spin and the motor that moves the tonearm was also spinning. It was even smelling a bit hot inside probably due to belt slipping. So it came apart again.

B&O linear track switches

B&O linear track off trigger

The first picture above highlights the 2 switches that control the motor and arm return points. I determined that the one on the right was not being activated when the tonearm came to rest, and by bending slightly the piece highlighted in the second image I was able to get that happening again. So it went back together...and the next mole popped back up.

This time the tonearm hesitated a bit at the beginning and end of the records before either getting to the music or heading to the leadout groove and shutting down. It would skip a few times before moving inward. After a bit of extra stylus pressure was added at the adjustment point (to just over 1 gram; these track very light) it seems fine again. I have now listened to several records and it is playing nearly flawlessly everytime. Very infrequently it seems to need an extra push of the up/down button to cue properly but that seems to be less frequent with more use. It could be that the lubricant is working its way into where it needs to be as things move it around.

In any case Glen Gould sounds pretty good right now!

B&O Beogram 4002 2

B&O Beogram 4002


Tuesday, 19 March 2013

Cleaning some records

A lot of the records I buy are used and often from thrift stores like Value Village and the Salvation Army. Occasionally they come from yard sales or Craigslist. Often they are not very clean.

I really try to avoid badly scratched records, in fact I pretty much always avoid those. I can live with a few minor ones and will consider ones that are worse if it is a rare or unusual record and the price is right...like free.

Anyway, I can't stand damaged or dirty records and I have a few ways that I can deal with that. My day to day arsenal is below:

Record paraphenalia


From left to right in order of how frequently I use it:
  • Decca Carbon Fibre brush. I use this virtually every time I play a side, brushing it off each time. The one you see I have had for over 20 years and it still works well.
  • Magic Eraser. Say what? Yes Magic Eraser. It works well at removing accumulated lint etc. from the stylus. The piece you see here is inside a piece of titanium tubing I left over from my bike shop days. More on that later...
  • Discwasher brush with D4 fluid. I will use this on records that may be a bit dirtier in appearance but I don't think a bath is in order or I want to play it right away. 
  • Discwasher Stylus brush and SC-2 fluid. This is more effective in some ways than the Magic Eraser but is bit less convenient. The other side of the brush is a convex mirror for inspecting the stylus but I never use it.
These are essentially the daily use things. I have a couple of carbon fibre brushes and a few Discwasher or similar brushes, plus another style or 2. I pick them up whenever I see them in thrift stores cheap.

The records that I buy new rarely need more than these tools as I take good care of them. The cheap finds though often need a good bath. 

For this I have a SpinClean which works well when I have a large batch to do. It will work for 25 to 50 records on one fill, and can sit for several days or a week if I don't have that many to do at once, or much time. 

http://www.spincleanrecordwasher.com/

When I have just to a few to clean I have another technique. This involves a home brew mix of distilled water (90%), 99% isopropyl alcohol (10%) and a dish soap (a few drops). This goes in a spray bottle. I have another spray bottle with just distilled water in it for rinsing. 

I lay a towel out on the counter top or my smooth top stove, and lay the dirty record on that. The one below is not that bad. 

Record dirty

I give the record 5 or 6 squirts from the bottle, trying to avoid the label.


Record wet

Now I take a paint pad, the kind you use for edges and corners, and use it in a circular motion to scrub the record using light pressure. The thousands of short bristles work well to work into the groves. I do this for 30 seconds or more, then flip the record and do the other side.

Record brushing


After washing I rinse under the tap in the kitchen sink. I have a water filter built in and there is little added to Vancouver water anyway, so I feel this is usually just fine. After rinsing both sides, I let the water run off and place the record upright in the dish drainer to dry. I will sometimes give them a wipe with a soft cloth, usually microfibre, to hasten the process.


Record rinsing

Record drying

Sometimes the label gets a bit wet, but I have not had one damaged by this yet. I know some people will make elaborate clamps to protect the label, but so far I don't see the need.

There are also those that will use devices that cost hundreds of dollars to do much the same as I do, including motorized and suction devices to pull away the washing liquid. However I can't justify that expense and feel that my method works well enough and is far superior to doing nothing or some simple "spread the dirt around" brushes that I see.

This won't take a really abused & scratched record and make it new again, but it will help with dusty, mildewed and finger print covered vinyl. I can see and hear dramatic improvements in the records I clean with my simple methods that anyone can do for a very small outlay in money and time. Not counting the Spin Clean (which cost me about $70 on sale), the paint pad method described above should cost only about $10 to 20 for the fluid, brush, and the cloth to dry the records and be enough to do many records.  

Titanium Magic Eraser

Oh, yeah I was going to mention the Magic Eraser. This little thing is a minor abrasive based on melamine I think, that can be used for all kinds of things. How it is used to clean a stylus is simply by lowering the needle into a block of the white stuff a few times, preferably using the cuing lever. The lint and other accumulated crap is removed by the minute pressure of the tonearm tracking force.

You can use a small block of the Magic Eraser that you cut off the store-bought size, or do as I did and make a neat little holder for it such as in the above picture. The metal cylinder is a piece of titanium tube that I cut off the end of an old handlebar years ago. The tube is just sharp enough to make it's own cookie cutter stamp right through the Magic Eraser. Below is another block I made from part of a light fixture.

But you don't need to do anything special; I was just having fun with it!

Magic Eraser 3


Sunday, 3 March 2013

A $15 NAD Trifecta almost pans out.

I visited a thrift store that I don't get to often today. I have found a couple of things there in the past, but it is not close to me and it can be a bit odoriferous there and not so much fun to browse.

It's an SPCA store and the place has always smelled of cat pee. It's better now but being winter-ish weather they don't have the doors open. Apparently the long term old manager who did not care what the cats did inside is gone and they have cleaned it somewhat but it still can assault the senses at times. It may be an SPCA store but you still have to put the cats out when they need to go!

NAD stack


As soon as I walked in I thought I might be on to something though. Obviously recently arrivals as they were still in a box and not on the shelves were a couple of pieces of NAD gear. I have always had a soft spot for NAD so I dove in.

I found the 701 stereo receiver, a 6220 tape deck and the 5355e CD player, and ended up with all 3 for $5 each. I had to look around for a power cord for the CD player and a place to plug them in to test but eventually I managed to get some lights on all 3 units. 

The receiver appeared to work, but had what I knew to to be a very common problem with NAD and that was burnt out bulbs in the back light assembly for the LCD display. I have had several pieces where this is the case and have managed to fix them all. The good thing is that the thrift stores take the lack of display as a sign of not working at all. For most people that might be a big problem, but not for me, and the receiver was offered to me at $5.

The same price applied to the tape deck and the CD player. The tape deck worried me the most as the displayed LEDs for the meter were all lighting and I wasn't sure that it would be worth any investment to fix. However it turned out to be the easiest as all it took was a bit of tapping inside to find a bad connection and it worked fine. 

The CD player seems to have a bad laser assembly though. Most of the controls appear to work, but it does not recognize a disc in the tray. I might be able to find a TOPH 7810 somewhere though and install that...That is the reason for the "almost pans out" title of the post. I might have to spend some more money to make the CD player work, if I can do it at all. 

Anyway, the 701 looks good now that I have installed some blue LEDs in the backlight housing. It works great. i am recording some Santana for the tape deck in the car right now!


NAD set

Here are some pics of the process of fixing the 701 backlight display.

NAD 701

The original bulb is soldered in and has a supply voltage of about 12 volts DC. I have picked up some LEDs specifically for this purpose so I was ready to go. One LED is often going to provide too localized a display and potentially too focused. Some of the LEDs I bought are frosted to help prevent this.

NAD 701 bulb

NAD 701 LED

After removing the original bulb from the small PC board at the back of the display I wired 2 in series with a small resistor. I drilled a couple of new holes in the PCB to hold the LED leads, and used one of the terminals on the the PCB to connect one side of the circuit, and the other one with the resistor I made an off board junction with the supply voltage line but covered it in heat shrionk tubing.

NAD 701 LED 2

It ended up working quite well. I had damaged the tabs that held the small PCB in place but it had also been glued in and I did this as well. The colour is darker than the original and much more to the Indigo side of things but I think it looks good!

NAD LED display

NAD set